Hello everyone, in this tutorial we will show you how to download data in excel in SAPUI5 application.
Prerequisites
- You should have SAP Netweaver Gateway Server on Netweaver 7.40 release.
- You should have a SAP Netweaver Gateway service ready with you. Click here.
- You should have a basic understanding of SAPUI5 Application and Netweaver Gateway OData Service.
Step-by-Step Procedure
Export data into excel in SAPUI5 application.
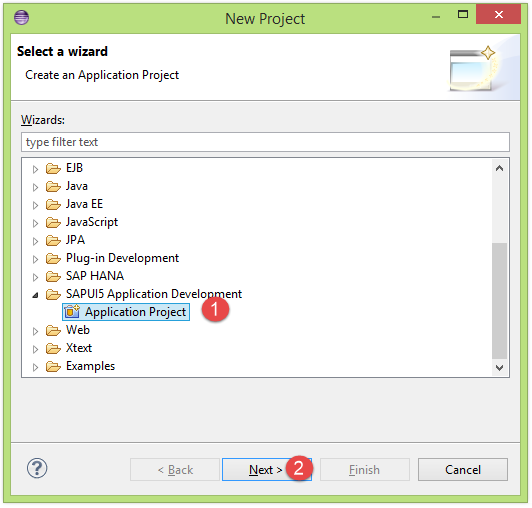
1. Open Eclipse IDE and create a SAPUI5 Application project by clicking on File → New → Project. Choose Application Project under SAPUI5 Application Development.
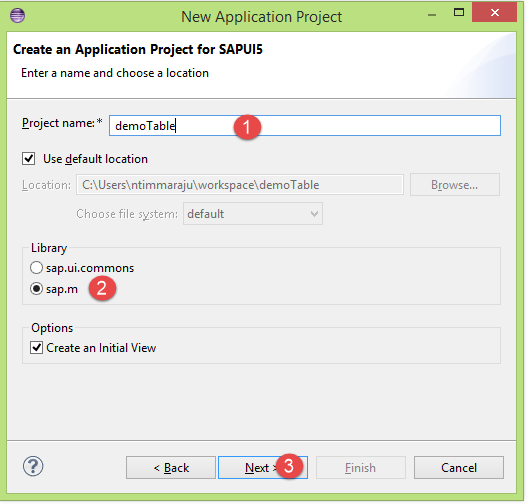
 2. Click on Next and provide the Project Name, choose sap.m library and hit Next to create a initial view.
 3. Provide the view name and choose type of the view as Java Script.Here you can choose any of the option as per your preference and hit Next to create project.
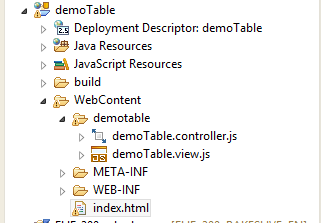
 4. A new SAPUI5 project is created in Project Explorer.
 5. Select index.html file in the project and double click to appear in the workbench window.Copy and paste the below code in the index.html file (or) adjust the code as per the below code.
Index.html
<!DOCTYPE HTML>
<html>
	<head>
		<meta http-equiv="X-UA-Compatible" content="IE=edge">
		<meta http-equiv='Content-Type' content='text/html;charset=UTF-8'/>

<!-- only load the mobile lib "sap.m" and the "sap_bluecrystal" theme -->
		<script src="resources/sap-ui-core.js"
				id="sap-ui-bootstrap"
				data-sap-ui-libs="sap.m"
				data-sap-ui-theme="sap_bluecrystal">
		</script>

		<script>
		sap.ui.localResources("demotable");
// 		1. Create an App
		var app = new sap.m.App({initialPage:"iddemoTable1"});

//		2. Create a Page
		var page = sap.ui.view({id:"iddemoTable1",
                                        viewName:"demotable.demoTable",
                                        type:sap.ui.core.mvc.ViewType.JS});

//              3. Add page to the App
                app.addPage(page);

		app.placeAt("content");
		</script>
	</head>
	<body class="sapUiBody" role="application">
		<div id="content"></div>
	</body>
</html>
6. Now double click on the demoTable.view.js to create and add Table inside the View. All the UI element controls should be placed in the CreateContent( ) method of the view. Add the below code to create a Table and columns of the table in the view.
demoTable.view.js
     // 1. Create Table
	  var oTable = new sap.m.Table("idOrderList", {
      inset : true,
      headerText : "List of Sales Orders",
      headerDesign : sap.m.ListHeaderDesign.Standard,
      mode : sap.m.ListMode.None,
      includeItemInSelection : false,
    });

    // 2. Add columns to the Table
    var col1 = new sap.m.Column("col1",{header: new sap.m.Label({text:"Order ID"})});
    oTable.addColumn(col1);

    var col2 = new sap.m.Column("col2",{header: new sap.m.Label({text:"Buyer ID"})});
    oTable.addColumn(col2);

    var col3 = new sap.m.Column("col3",{header: new sap.m.Label({text:"Buyer Name"})});
    oTable.addColumn(col3);

    var col4 = new sap.m.Column("col4",{header: new sap.m.Label({text:"Net Amount"})});
    oTable.addColumn(col4);

    var col5 = new sap.m.Column("col5",{header: new sap.m.Label({text:"Currency"})});
    oTable.addColumn(col5);


    // 3. Bind Aggregation
    // "/SalesOrderSet" is the entity set Name
    var colItems = new sap.m.ColumnListItem("colItems",{type:"Active"});
    oTable.bindAggregation("items","/SalesOrderSet",colItems);

    // 4. Define type of each every column
    var txtNAME = new sap.m.Text("txtNAME",{text:"{SoId}"});
    colItems.addCell(txtNAME);

    var txtNAME2 = new sap.m.Text("txtNAME2",{text:"{BuyerId}"});
    colItems.addCell(txtNAME2);

    var txtNAME3 = new sap.m.Text("txtNAME3",{text:"{BuyerName}"});
    colItems.addCell(txtNAME3);

    var txtNAME4 = new sap.m.Text("txtNAME4",{text:"{NetAmount}"});
    colItems.addCell(txtNAME4);

    var txtNAME5 = new sap.m.Text("txtNAME5",{text:"{CurrencyCode}"});
    colItems.addCell(txtNAME5);


    // 5. Create a button "Download" with Event handler method
    var btExcel = new sap.m.Button({
      text: "Download",
      press : function(oEvent){ oController.Download(oEvent); }
    });

    // 5. Add Table to Page
    return new sap.m.Page({
      title: "Excel Download",
      content: [ oTable ],
      footer: new sap.m.Bar({ contentRight: [btExcel],
        design: "Footer"
      })
    });
  }
7. Now double click on demoTable.controller.js to call the OData service url to get the data from the backed and also the code to download the table data in excel.
demoTable.controller.js
	onInit: function() {

	  var sServiceUrl = "/sap/opu/odata/sap/ZDEMO_GW_SRV_SRV/";

	  // set data model
	  var oModel = new sap.ui.model.odata.ODataModel(sServiceUrl, {
	    json: true,
	    defaultBindingMode: "OneWay",
	    useBatch: true,
	    defaultCountMode: "Inline",
	    loadMetadataAsync: true
	  });
    sap.ui.getCore().setModel(oModel);
	},

//      Code to download the data in excel format
	Download: function(oEvent){
	  var sUrl = "/sap/opu/odata/sap/ZDEMO_GW_SRV_SRV/SalesOrderSet?$format=xlsx";
          var encodeUrl = encodeURI(sUrl);
	  sap.m.URLHelper.redirect(encodeUrl,true);
	},
8. We are ready with application. Save the application and deploy it in SAPUI5 ABAP Repository.To know the steps on how to deploy SAPUI5 application to ABAP Repository click here.
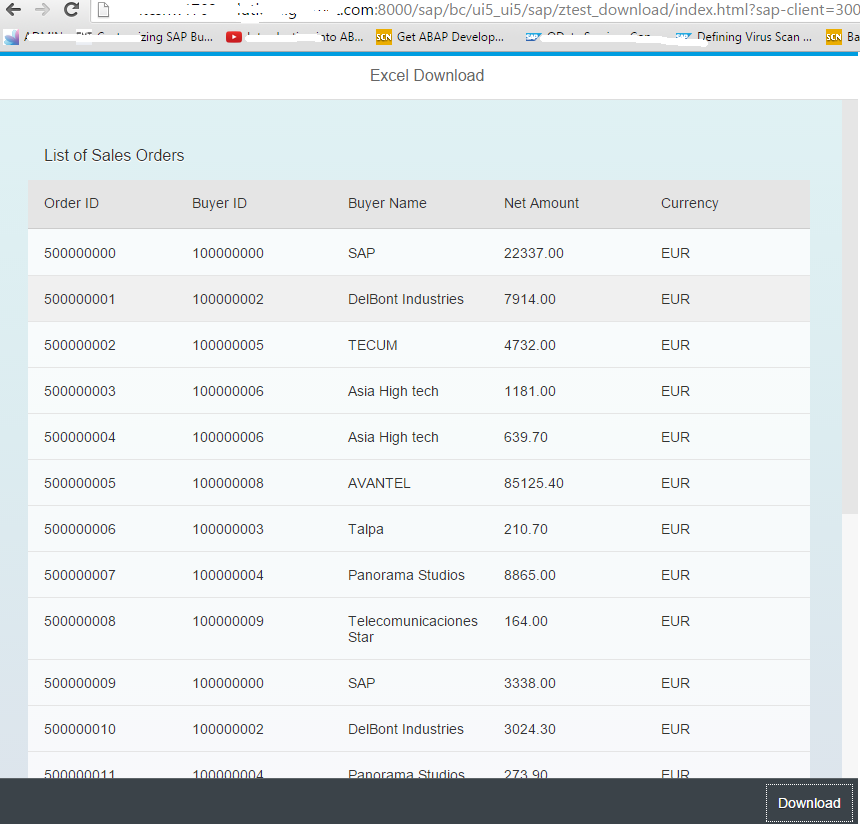
9. After deployment of the application its time to test the URL.The URL of the SAPUI5 application will look like below.
http://<server_name>:8000/sap/bc/ui5_ui5/sap/<application_name>/index.html?sap-client=300
For Example:
https://saplearners.com:8000/sap/bc/ui5_ui5/sap/ztest_download/index.html?sap-client=300
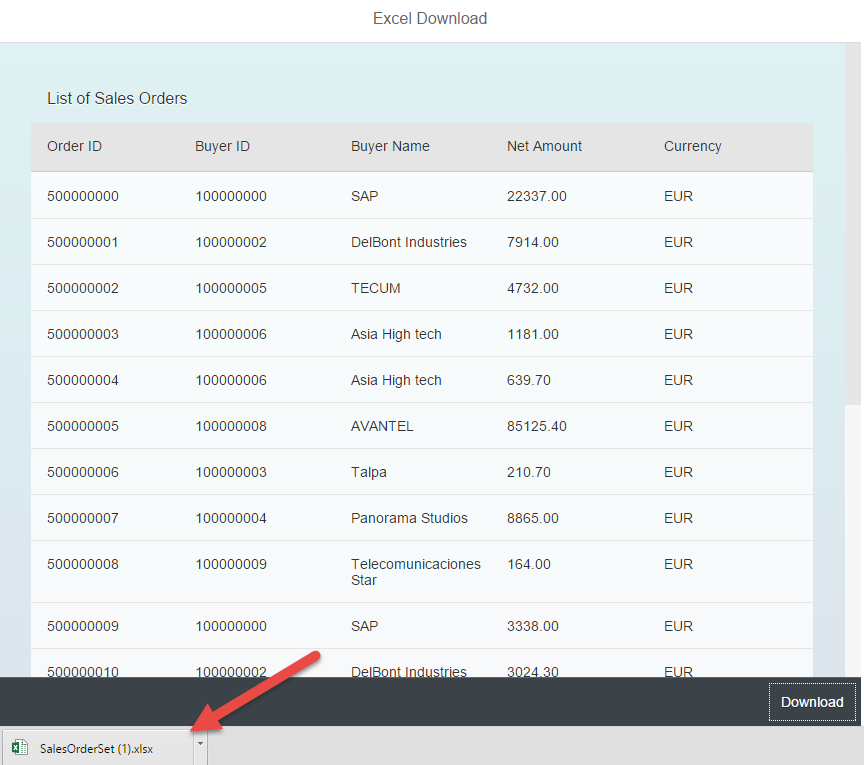
10. If every thing is working fine, you should see the below output.
 11. Now click on the Download button to download the table data into excel.
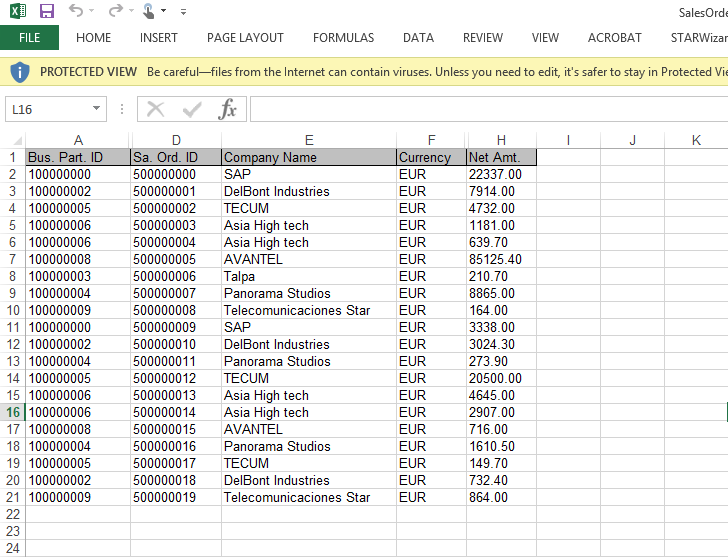
12. Open the excel file downloaded.
You have successfully created a SAPUI5 Application to download data in excel.
Please stay tuned to us for more SAPUI5 Tutorials. Please feel free to comment and let us know your feedback. Subscribe for more updates
Thank you. 🙂


Comments are closed.